On this page:
General assignment settings
Schedules
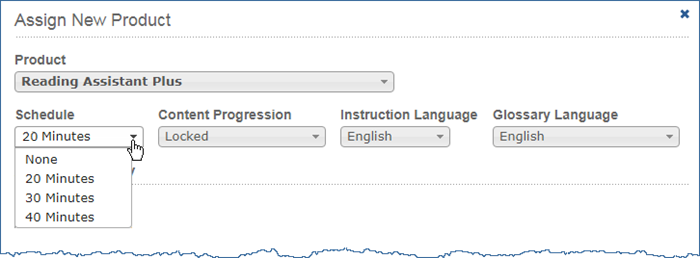
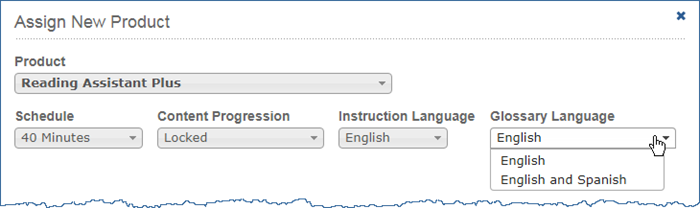
A Reading Assistant Plus schedule determines the length of time spent training in the component each day. When assigning Reading Assistant Plus, you’ll need to determine the daily work time for the student as follows. See Create Reading Assistant Plus assignments and Edit Reading Assistant Plus assignments for steps on setting a schedule.
Use a schedule – Automatically notifies the student after a set number of minutes (default). Reading Assistant Plus provides schedules to help time the student’s work session each day. For example, when the student completes the current selection after working for the scheduled number of minutes, the software will notify the student that time is up. The student can either exit or continue the session. The schedule always starts over on the next work session, even if the schedule has time remaining. Each assignment includes multiple schedule options: None, 20, 30, or 40 minutes. The schedule is set to 30 minutes by default.
Opt out of a schedule – Does not track how long the student uses the component. The “None” option lets you opt out of the schedules entirely and implement the student’s daily work schedule on your own. For example, you could instruct the student to work on Reading Assistant Plus until he or she completes a specific set of activities each day, regardless of the time spent training. Or, you could allow the student to work on the activities as long he or she likes.
Content progression
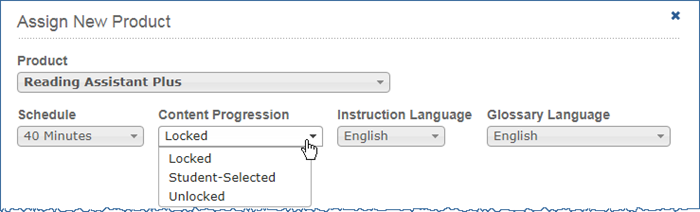
When assigning Reading Assistant Plus, you’ll need to decide how you want the student to progress through the content. Choose from three options. See Create Reading Assistant Plus assignments and Edit Reading Assistant Plus assignments for steps on setting content progression.
Student-selected – The student has flexibility in selection choices only (default). When you assign the Reading Assistant Plus component, students have some control over the content progression. The student can work on any selection in a library; however, once a selection is started, the student must complete all of the selection activities, in order, before moving on to a new selection. A selection is considered started when the student completed the Word Wall activity.
Locked – The student must complete topics, selections, and activities in a planned order. As an alternative, you can lock the content progression. This way, the student must complete all activities within a selection and all selections within a topic, in the order that they appear in the library. The student may not move from one selection to the next without completing all of the activities, in order.
Unlocked (teachers only) – The teacher has maximum flexibility to demonstrate the component. Recommended for teachers/classroom instruction only. This option allows the user to demo any selection within any topic, and any activity within that selection, in any order. Unlocked progression provides teachers with the flexibility to model different aspects of the component to a student.
Important! Unlocked mode is for teachers only. Using this setting with students is risky, and could result in data loss if changed during an assignment.
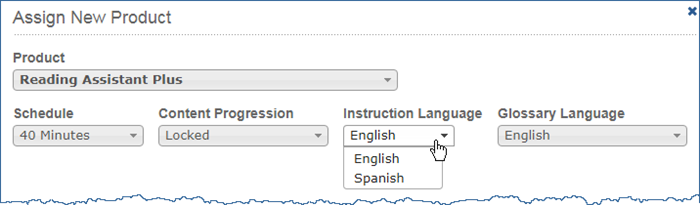
Instruction language
The Reading Assistant Plus software provides audio instructions throughout the component. By default, the software presents the instructions in English. As an alternative, you can choose to present the instruction audio in Spanish. See Create Reading Assistant Plus assignments and Edit Reading Assistant Plus assignments for steps on setting instruction language.
Note: District managers and school managers can change the default instruction language for an entire school. Access this option from the Schools page.
Glossary language
The Reading Assistant Plus software provides a glossary for some of the words within a selection. By default, the software provides the glossary information in English. As an alternative, you can choose to present glossary information in both English and Spanish. Then, students can use an Español button to access the Spanish glossary information. See Create Reading Assistant Plus assignments and Edit Reading Assistant Plus assignments for steps on setting glossary language.
Note: District managers and school managers can change the default glossary language for an entire school.
Library settings
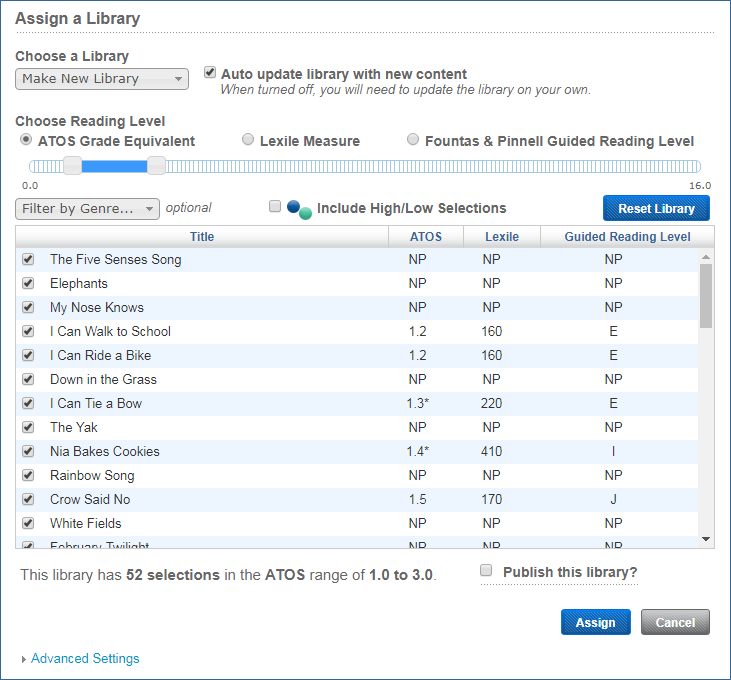
Choose a library
This menu lets you make a new library or choose an existing published library for the assignment. Note that because published libraries are not editable, you cannot change any of the library settings if you choose a published library. See Create Reading Assistant Plus assignments and Edit Reading Assistant Plus assignments for steps.
Auto update library with new content
As Scientific Learning releases new content, mySciLEARN automatically adds those selections to your libraries. If you have a special library that you don’t want updated, you can always turn off the option “Auto Update Library with New Content” when creating that library. If the library is not published, you can turn it back on later if needed, and the component will download all new content that’s been released since you first turned it off. See Create Reading Assistant Plus assignments and Edit Reading Assistant Plus assignments for steps.
Best practice: Leave this option on when publishing a library. Published libraries cannot be edited once they are published, so you won’t be able to turn this option back on again.
Choose reading level
Choose one of three readability measures by which to filter the content in the library: ATOS GE, Lexile Measure, or Fountas & Pinnell Guided Reading Level. Reading selections appear in a list, sorted by reading level score. See Create Reading Assistant Plus assignments and Edit Reading Assistant Plus assignments for steps.
- Non-prose selections such as poetry cannot be leveled and therefore show NP in the list.
- For ATOS GE, selections with fewer than 150 words show an asterisk next to them, indicating that the score is approximate and may not be 100% accurate. The score becomes more accurate as the word count approaches 150. Hold your mouse over the asterisk to see the note.
- For Fountas & Pinnell Guided Reading Level, selections that exceed the highest score (Z) show NA instead of a score.
Adjust the reading level range
When you choose a readability measure, move the reading level sliders left or right as needed, to filter the selections by reading level and create an appropriate reading level range for the library. By default, the reading level ranges are set as follows. See Create Reading Assistant Plus assignments and Edit Reading Assistant Plus assignments for steps.
- ATOS GE – 0.0 to 1.5
- Lexile Measure – 60L to 300L
- Guided Reading Level – A to D
To learn more see Reading levels.
Selections that are “chapters” within a series are grouped together, even when the reading levels vary across the selections. If the average reading level of the series falls within the selected range, the entire series of selections will be included in the range. To learn more see Library organization.
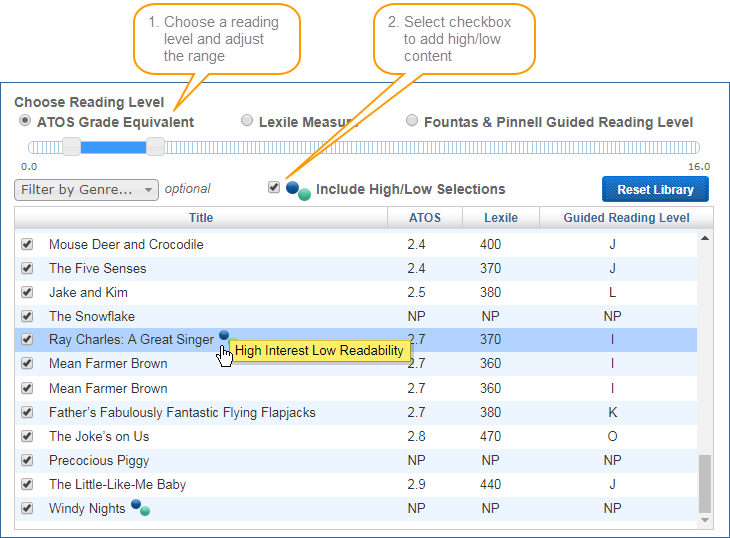
Include high/low selections (optional)
Reading Assistant Plus provides “high interest/low reading level” selections across a variety of reading levels, for students in middle school and beyond who need intensive reading support. For example, the selection Skateboarding! includes content designed to appeal to an older student, but written at a 3rd grade reading level to accommodate a struggling reader in middle or high school. This is also referred to as “high/low” or “hi/lo” content.
You can add high/low content while making a new library (libraries do not include high/low selections by default). Choose a reading level range, then select the Include High/Low Selections option that appears on the screen. Any high/low selections in that reading level range will be added to the library, with a high/low icon after the title. ![]()
Once added, you can manage those high/low selections just as you would any other selection in the library; for example, you can filter those selections by genre, review the selection text, and remove them as needed. See Customize the library (optional) for more.
Customize the library (optional)
Use these features to further customize the library as needed. See Create Reading Assistant Plus assignments and Edit Reading Assistant Plus assignments for steps.
- Use the Filter by Genre menu to limit the library content to specific genres; for example: Biography, Classic Fiction, Fantasy, Folklore/Fables/Myths, General Fiction, Nonfiction, Poetry, Realistic Fiction, Science Fiction.
- Uncheck a selection to remove it from the library
- Use the Reset Library button to restore the library to its original state (add any removed sections back in and remove any genre filters).
- Click a selection title to view the entire text.
Publish this library (optional)
Choose this option if you want to publish the library and share it with other students and instructors at your school. Enter a unique an meaningful name for the library, keeping in mind that other staff and students will see the library name when they use the component. For example:
- ATOS 1.0-1.5 (the reading level measure/range in the library)
- Smith Fall 2017 (the instructor name and semester/year)
See Create Reading Assistant Plus assignments and Edit Reading Assistant Plus assignments for steps.
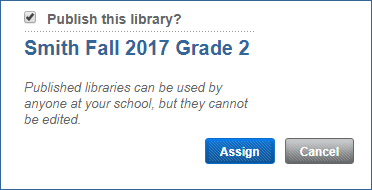
Note that published libraries cannot be edited once they are saved. Also, published libraries cannot be deleted once created. They will be added to the Choose a Library menu, and will be available to everyone at your school. To learn more see Publishing libraries.
Advanced settings
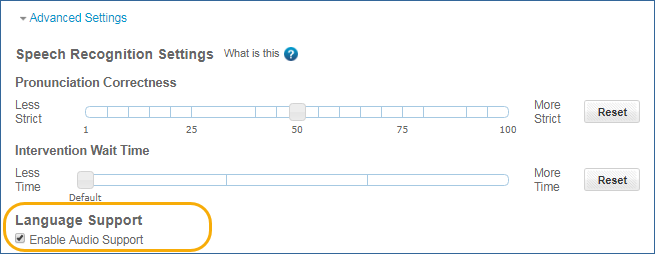
Speech recognition settings
Reading Assistant Plus uses speech recognition and verification technology to monitor a student as he or she reads aloud. If the software does not hear a word read correctly, it gently intervenes by highlighting that word in yellow. The student should read the highlighted word again and then continue reading from that word. If the software still does not hear the word read correctly, it pronounces the word for the student. Again, the student should repeat the pronounced word and then continue reading from that word.
For most readers, the default speech recognition settings will support their use of the Reading Assistant Plus component during the Read and Record activity. However, some students may need their settings adjusted to help maximize their experience. Reading Assistant Plus allows you to change the speech recognition settings as needed. When changed, the new settings take effect immediately.
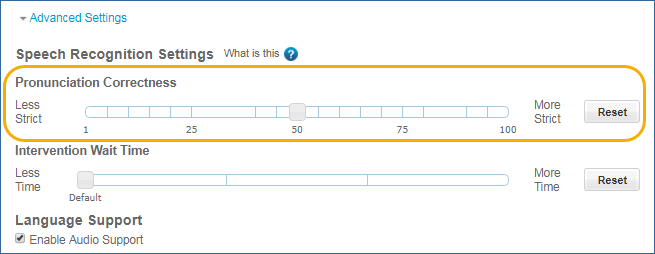
Pronunciation correctness
The accuracy with which a student pronounces a word during the Read and Record activity can vary depending on the student’s understanding of that word, or as a result of an accent or other speech characteristics. The Pronunciation Correctness option allows you to adjust the software to be more strict or less strict (on a scale of 1 to 100) when evaluating a word. Finding the appropriate setting can greatly enhance the experience with the component. For example:
- If the student is struggling excessively with his or her reading, you might want to decrease (or relax) the strictness of the pronunciation requirements. Start by moving the correctness slider to the left toward Less Strict, from the default 50 mark to the 25 mark. If the student is still having difficulty, you can move the correctness slider all the way to the 1 mark; however, at this lowest setting the software will be extremely lenient and will not correct most mispronunciations.
- If the software allows the student to mispronounce many words without intervening, you may want to increase the strictness. Move the slider to the right toward More Strict by increments of 10, then adjust as necessary.
- Use the Reset button to restore the pronunciation correctness setting to 50.
See Create Reading Assistant Plus assignments and Edit Reading Assistant Plus assignments for steps on setting pronunciation correctness.
Tip: If you notice that the software continually intervenes on correctly read words, and the student does not have a strong accent or any other speech issue, there may be a problem with the audio quality. Listen to the student’s recording to determine if audio quality is the issue. If so, correct the audio issue rather than change the correctness slider.
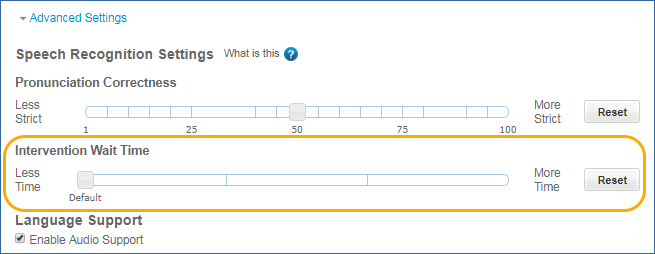
Intervention wait time
Use the Intervention Wait Time option to change the amount of time before the component intervenes during the Read and Record activity. For example, if the student is struggling and needs more time to decode words, you could increase the time before an intervention so that the student has adequate time to read the text; just move the slider to the right, toward More Time. Use the Reset button to restore the default intervention wait time.
See Create Reading Assistant Plus assignments and Edit Reading Assistant Plus assignments for steps on setting intervention wait time.
Audio language support
The Reading Assistant Plus component provides audio support for the Think About Its hints and Take the Quiz questions and all possible answers. When a Think About It or quiz question opens, the software automatically reads the question and answer options to the student. Students can use the speaker icon to hear these items again. Think About Its may also have hints that are read to the student, and the hint icon can be clicked to hear the hint audio again.
The Enable Audio Support option is selected by default. You can disable it for students who do not need the additional assistance. When changed, the new settings take effect immediately. See Create Reading Assistant Plus assignments and Edit Reading Assistant Plus assignments for steps.
Note: District managers and school managers can change the default language support option for an entire school.