On this page:
About creating assignments
The Assign feature lets you create your own Reading Assistant Plus assignments. If you have not yet added students to mySciLEARN, see Add, edit, and delete students.
Tips for creating assignments
mySciLEARN provides Auto Initial Assignment, which automatically assigns Reading Assistant Plus to your student and then place that student at the appropriate starting point in the content. See the following topics for steps.
- Set Auto Initial Assignment for your students
- Set Auto Initial Assignment for a school (RA Plus only)
You can only assign components when a license and Support Package agreement is available. For more information see Manage licenses for your students. If you have any questions, contact Carnegie Learning Customer Support.
To change a student's assignment settings see Edit Reading Assistant Plus assignments. To end a student's assignment see Stop/delete Reading Assistant Plus assignments.
Create an assignment for a student or group
- In mySciLEARN Manage section, click the Students tab to access the Students page.
- Perform one of the following tasks:
- Locate the student in the students list. You can filter the student list by using the Browse by School, Filter by My Groups, or Filter by Staff options on the left, or you can search for a student using the Search feature at the top of the screen.
- Click the student’s name to open that student’s profile.
- Click the New Assignments button in the Assignments section.
- Select your school from the Browse by School list, if needed.
- Select your group from the Filter by Group list.
- Select the checkbox next to one or more students, or select the checkbox at the top of the students list to select all of the students on the screen.
- Select Assign New from the Manage Assignments menu.
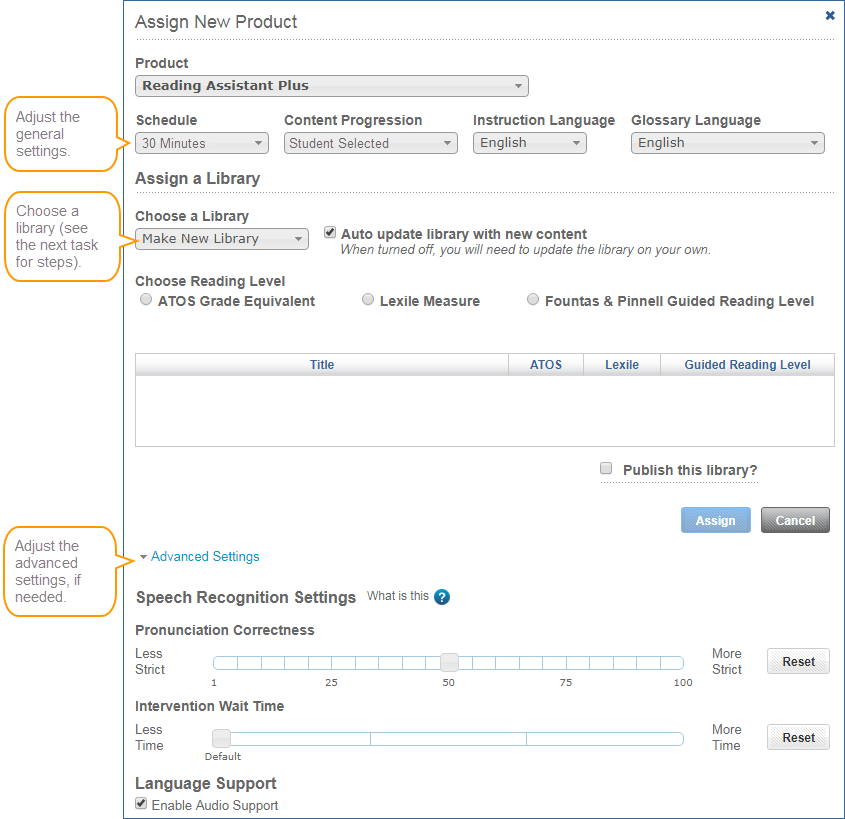
- On the Assign New Product screen, select Reading Assistant Plus from the Product menu.
- Adjust the general assignment settings as needed. For details see General assignment settings.
- Schedule
- Content progression
- Instruction language
- Glossary language
- Click Advanced Settings at the bottom of the screen and make adjustments as needed. For details see Advanced settings.
- Speech recognition settings (pronunciation correctness, intervention wait time)
- Language support
- From the Choose a Library menu, choose a library for the assignment. Continue with the next task, Choose a library for the assignment.
For an individual student from a student’s profile:
For a student or a group from the students list:
You must have an available license and Support Package agreement for the product. See Manage licenses for your students.
Choose a library for the assignment
When creating a Reading Assistant Plus assignment, the software prompts you to choose a library.
Make a new library. If you make a new library for the assignment, you have two options:
- You can use the library in the current assignment only. The library will remain open for the students in the assignment and can be edited later on as needed.
- You can publish the library so it can be shared throughout your school. Published libraries are available to all instructors at the school, but they cannot be modified or edited once they are published, even for the students in the original assignment (to learn more see Publishing libraries).
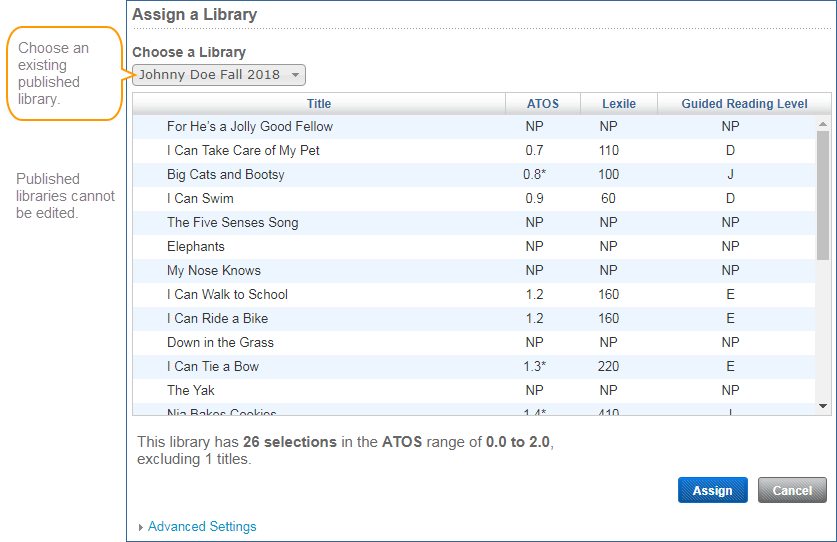
Choose an existing published library. Choose a library that’s been created by you or another instructor at your school and published.
Note: A student can only be assigned one Reading Assistant Plus library at a time.
Make a new library
- Choose Make New Library from the Choose a Library menu.
- Under Choose Reading Level, choose one: ATOS GE, Lexile Measure, or Fountas & Pinnell Guided Reading Level.
- Selections with a score of “NP” are non-prose (poetry) and cannot be leveled.
- For ATOS GE, selections with fewer than 150 words are difficult to level; their scores may not be accurate (selections appear with an asterisk). The score becomes more accurate as the word count approaches 150.
- For Fountas & Pinnell Guided Reading Level, selections that exceed the highest score (Z) show NA instead of a score.
- Move the reading level sliders left or right as needed, to filter the selections and create a suitable range for the library. Hover over the slider to see the exact score. See Designing libraries for tips.
- Review the list of selections and make any adjustments as needed.
- Select the Include High/Low Selections option to add any high/low selections within that reading level range to the library. See Include high/low selections (optional) to learn more.
- Use the Filter by Genre menu to refine the selection content (for example, Classic Fiction and Poetry).
- Use the checkboxes to remove selections from the library.
- Click a selection title to view the entire selection text.
- Click Reset Library to restore the library to its original state and remove any filters.
- Use the library for this assignment only, or publish it:
- Make sure that Publish This Library is NOT selected.
- Click Assign at the bottom of the screen to create the assignment. The library will remain open for that assignment and can be edited later on as needed.
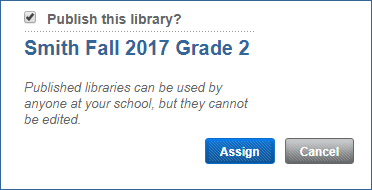
- Select the Publish This Library option.
- Enter a unique name for the library in the Add Name field. Use a meaningful name. For example:
- ATOS 1.0-1.5 (the reading level measure/range in the library)
- Smith Fall 2017 (the instructor name and semester/year)
- Click Assign at the bottom of the screen to create the assignment.
Auto update library with new content. If you prefer to manually update the library with new content as it’s released from Scientific Learning, you can turn off that feature; however, libraries that are published cannot be edited, so leave this on if you would like your published library to receive new content.
All of the selections in the library appear in a list. Each selection shows a corresponding reading level score. See Reading levels.

To use the library for this assignment only:
To publish the library so it can be used by other students at your school:
If you are creating a library for a specific student and would like to publish that library, avoid using the student’s name as part of the published library name. Instead, try using general descriptive text that others at your organization will find useful. Also keep in mind that students and other staff members will see the library name.
Remember: Published libraries cannot be edited once they are saved, even for the original assignment. Also, published libraries cannot be deleted once created. They will be added to the Choose a Library menu, and will be available to everyone at your school. To learn more see Publishing libraries.
Choose an existing published library
- From the Choose a Library menu, choose that library.
- Click Assign at the bottom of the screen to create the assignment and complete the task.
Libraries that have already been published must be used as is; they cannot be edited.