When needed, you make changes to a student’s Reading Assistant Plus assignment; for example, you can select a new schedule for the component or choose a new library for the assignment.
You can only edit assignments for an individual student. If you're using Auto Initial Assignment, you can edit the assignment settings once the student has been assigned and placed into the component; for example, to change any of the default assignment settings before the student starts training, or to adjust the placement. For more information see Reading Assistant Plus Auto Initial Assignment.
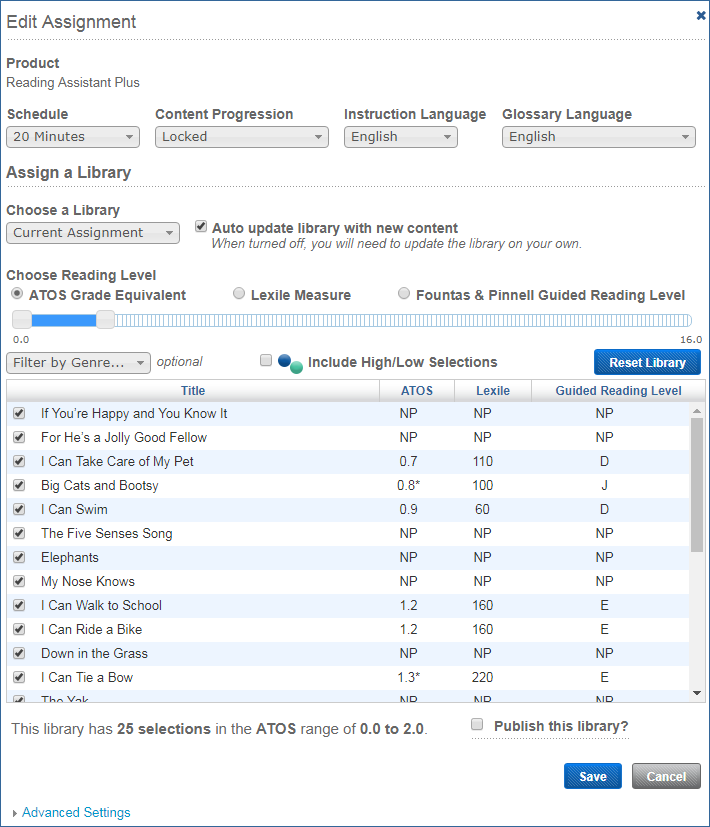
- From the Manage > Students page, locate the student with the assignment you want to edit and click the student’s name to open their profile. See The students list.
- In the Assignments section, click the Edit icon next to the Reading Assistant Plus.
- Edit the general assignment settings as needed. See General assignment settings.
- Schedule
- Content progression
- Instruction language
- Glossary language
- Edit the library assignment as needed. See Library settings.
- The software will automatically adjust the assignment and place the student at the first selection that has not been completed in the library, unless the student was working on a selection that appears in both libraries; in this case, the student will need to complete that selection first.
- If you’ve assigned a new library, the Student Profile screen will adjust the assignment status to reflect the new library. The student will have access to the new library only.
- The student’s reports and audio recordings for the original library will remain intact and will still be available.
- If the library is not already published and you’d like to publish it, select the Publish this Library checkbox and enter a unique and meaningful name for the library. Published libraries cannot be edited. To learn more see Publishing libraries.
- Click Advanced Settings at the bottom of the screen to edit the settings as needed. See Advanced settings.
- Speech recognition settings (pronunciation correctness, intervention wait time)
- Language audio support
- Click Save.
If the current library is published, you can choose a different library or make a new library (published libraries cannot be edited). If it’s not published, you’ll see “Current Assignment” in the library field. This means you can edit the content in that library.
When you change the library assignment: