On this page:
What is a student group?
mySciLEARN works best when you organize your students into groups. Groups are designed to help you manage students that have something in common. Think of a group as a class within a school. For example, you can organize groups based on the school year and one of the following criteria:
- Training time and date. 1st Period Fall 2010, 10am Spring 2011
- Classroom or teacher. Mr Perez 2010-11
- Training location. In Class Fall 2010, Spring 2011 At Home
- Demographic data. ELL 2010-11, 3rd Grade 2010
Students must belong to at least one group. However, students can belong to more than one group; this will not impact their experience with the Fast ForWord product.
Use the Students page to manage groups of students.
About the Default group
Because all students must belong to at least one group, mySciLEARN provides a “default” group for each school. The Default group functions just like any other group in your school, providing access to the group functions on the Students page and the teacher reports on the Reports page.
- Just like any other group at the school level, district managers and school managers are automatically associated with the Default group, but instructors are not. This provides additional security and privacy for students at the school. District managers and school managers can associate instructors with the Default group as needed.
- Students who are not associated with any group will be added to the school's Default group. For example:
- When transferring a student to another school, that student will be added to that school's Default group (district and school managers only).
- When importing students from a file, if you don't specify a group in the import file, those students will be added to the Default group (district and school managers only).
- When removing a student from that student's only group, the student will be added to that school's Default group. See Manage group membership.
- Also, when deleting a group that includes students who are not in any other groups, those students will be added to that school's Default group. See Delete a group.
- When an instructor who does not own any groups adds a new student, that student will be added to the Default group. See Add, edit, and delete students.
- When transferring a student to another school, that student will be added to that school's Default group (district and school managers only).
Note: The Default group cannot be renamed or deleted from the system.
Add a group
You can organize your students into groups using several methods:
- By using the +New Group button and the More Actions menu on students list (covered in this topic)
- By using the Add to Group button inside a student’s profile.
- By using the New Group button inside a staff member’s profile.
Follow these steps to add a new group from the students list.
- In mySciLEARN Manage section, click the Students tab to access the Students page.
- Select your school from the Browse by School list, if needed.
- Locate the students in the students list. See The students list.
- Select the checkbox next to the students, or select the All checkbox at the top of the students list to select all of the students on the screen.
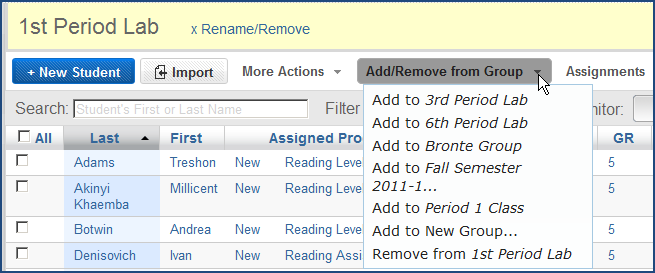
- From the Add To/Remove From Group menu, select Add to New Group.
- Enter a significant and unique name for the group in the New Group Name field and click Add Students to Group. See What is a student group? for tips on naming a group.
If you do not plan to add students to the new group right away, click the New Group button under the Filter by My Groups and add a new group. You can add students to the group later. See Manage group membership.
The new group is created and automatically associated with you. To associate the group with other staff members, contact your school manager or district manager.
-CreateNewGroupMultiple.png)
Manage group membership
All students must belong to at least one group. This topic provides instructions for managing the students in a group, including adding students to a group and removing students from a group.
- In mySciLEARN Manage section, click the Students tab to access the Students page.
- Select your school from the Browse by School list, if needed.
- Locate the students that you would like to add to or remove from the group.
- If you are removing students from a group, select that group in the Filter by My Groups option on the left of the Student page.
- If you are adding students to a group, locate the student in the students list. See The students list.
- Select the checkbox next to the students you're moving, or select the All checkbox at the top of the students list to select all of the students on the screen.
- From the Add/Remove from Group menu, add/remove the student to/from a group, then confirm the action to complete the task.
When removing students from a group, the students must belong to at least one other group. If not, the students will be automatically added to the school's Default group.
Rename a group
Use the following instructions to rename an existing group; for example, if the name is no longer significant, or if it is being confused with another group name.
- In mySciLEARN Manage section, click the Students tab to access the Students page.
- Select your school from the Browse by School list, if needed.
- From the Filter by My Groups list, select the group you’d like to rename.
- Select Rename/Remove next to the Group name to open the group for edit.
- Type the new group name in the group name field and click Save.

Delete a group
Groups can be deleted when all of the students have been removed from that group and the group is no longer needed. For example, at the end of the school year, you can remove a group for students who have completed the Fast ForWord product and have been either deleted from the system or moved to other groups. Students who are not in another group will be automatically added to the school's Default group.
- In mySciLEARN Manage section, click the Students tab to access the Students page.
- Select your school from the Browse by School list, if needed.
- From the Filter by My Groups list, select the group you’d like to delete.
- Select Rename/Remove next to the Group name to open the group for edit.
- Click the trash icon next to that group name to move the group to the trash, then click Confirm Delete Group to complete the task.
